4.6 Common Channel Operators
This section is an introduction to some of the channel operators that are used in many situations. There is an example file that is included in the .zip folder.
Generator CHOPs
Constant
The Constant CHOP holds up to 40 unique constant values. The channel name is defined in text field on the left, and the value is defined with the number field slider on the right.
When a Constant CHOP is created, only 1 channel is active. If a channel is not active, its number field is greyed out. To activate a channel just give it a name, and the number field will light up as well as show up in the operator viewer.
To create multiple channels with the same value, you can name the channels using pattern matching.
If you enter chan[1-4] in the name field, 4 channels will be created: chan1, chan2, chan3, and chan4. These channels will all have the same value.
Noise
This CHOP generates a set of pseudo-random points according to the settings in the operators Parameters. There are 6 different algorithms to choose from, each with different characteristics and may suit some situations better than the others.
The basis for each algorithm is the seed value. You can have 2 Noise CHOPs with the same values, and the noise would look the same, but if you change the seed, it will generate a set of points based on the new seed number, creating a different result. (ex.1 of noise.toe)
To create movement, you can change values on the Transform page. If you enter absTime.frame to the first Translate field, you can see that the noise begins to scroll along the x-axis. (ex. 2 of noise.toe)
To create multiple channels of noise, go to the Channel page of the Parameters, and in the Channel Names field, enter the names of the channels separated by a space. (ex.3 of noise.toe)
The number of samples you would like to generate is determined by the settings on the Channel page, with the Start, End, and Sample Rate. The amount of time multiplied by the sample rate. But if you only need 1 sample at a time, you can go to the Common page, and turn the Time Slice toggle to On. This creates 1 random value per channel for each frame, which requires less CPU usage. (ex.4 of noise.toe)
Pattern
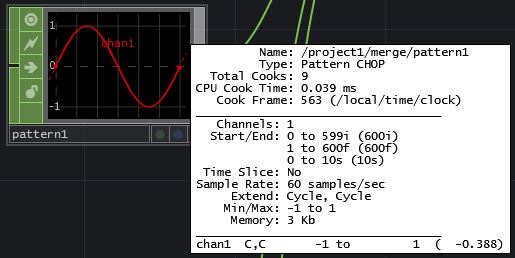
The Pattern CHOP generates a function that is a set amount, or array, of samples.
The size of the array is set by Length on the Pattern parameter page, and the type of function is chosen by Type.
Cycles is the amount of times the function loops within the amount of samples.
There are settings to control your pattern, depending on what Type you have chosen.
From Range and To Range are very useful for something like a sine wave that creates a -1 to 1 value, but you need a 0 to 1 value. (There's more on this later, in the Math CHOP section).
(ex.3 in pattern.toe)
This is a great tool for creating lookup tables. (ex.4 in pattern.toe)
LFO
The LFO CHOP generates an oscillating value according to the parameter settings. It goes back and forth between 2 values that are determined by Amplitude and Offset, over a given time, or Frequency.
Frequency generally determines how many cycles per second, except when a value is connected to the first input for Octave Control. If the Octave Control value is set to 1, the speed is doubled, and if the value is set to 2, the speed is doubled 2 (4x), etc. (ex.2 of noise.toe)
The shape of the oscillation is controlled by Type.
You can also oscillate using a different oscillation pattern by using the 3rd input. (ex.3 of lfo.toe)
Timer
This CHOP is very useful for anything that involves fixed time periods. You can trigger the timer and recieve different types of data throughout its duration, as well as set it do act different ways when it ends.
The timer can run once and stop at the end, run once and reset itself, repeat itself a certain amount of times, or indefinitely.
Use the Timer parameter to set the length of the timer, and trigger it to start or reset. You can use Delay to set an amount of time to wait after the Start button was triggered, to actually start the timer.
Cue Point sets a point during the timer that you can jump to by triggering the Cue pulse. If you'd like to be able to jump to a point that is half way through the duration of the timer, set Cue Point to 0.5.
On the Outputs parameter page, you can select what information you would like to recieve. Some common outputs are:
Timer Fractiondisplays the percentage of the set time period that has passed, in a 0 to 1 value. 0.5 would mean the timer is half done and 1 meaning the timer is finished.Doneis a value of0while the timer is initialized or running, and turns to1when the timer has finished. It will turn back to0once theInitorStartbutton is triggered again.
Filter CHOPs
Math
This is probably the most commonly used CHOP. It takes data from its inputs and manipulates it in different ways :
The most intuitive use would be to take a value and perform some simple math, like add 10, or multiply the given value by 10. This is done on the Mult-Add parameter page.
Commonly, we need to take a value, or set of values, and adjust them according to another value or set of values. For example, if our end desire is to have a value moving up and down over time, but we also want to add a random jitter, we could use a Pattern CHOP to create a SIN wave, a Noise CHOP to create a random set of numbers, and using the OP parameter page of a Math CHOP, we could set the Combine CHOPs drop-down menu to Add. The result could look something like this :
Another very useful function of the Math CHOP is the Range parameter page. This takes a range of values, and re-maps them to a new range. For example, if you have an LFO CHOP that ramps from 0 to 1, but you need that same movement to fit between the specific values of 7.9 and 51.4, it is much faster to use the From Range and To Range parameters than to adjust it using order of operations.
Select
This CHOP can be used to split up data that is contained in a single CHOP, or can be used to grab data from a remote section of a project. You can also rename channels that you are selecting at the same time.
If you have a CHOP that contains several channels of information, and need to apply a process to 2 of the channels, but not all, a Select CHOP will allow you to name the channels that you want to focus on. Use the Channel Names field on the Select page of the parameters to list the channels you require, separated by a space.
If you want to re-name these channels to something else, you can use the Rename From field to write the original channel names, and the Rename To field to enter the new names.
This CHOP also allows you to point to other CHOPs from different areas of a project. Lets say you have have data in a Constant CHOP that is nested inside 2 other COMPs. TheConstant CHOPs path is /project1/base1/base1/constant1. But your project requires you to access this data in your /project1 COMP. You could either make some Out CHOPs and manually wire the information, or use a Select CHOP to wireless point at the path of the constant CHOP, which usually quicker and keeps the network more organized. In the CHOP field of the Select parameter page, enter project1/base1/base1/constant1, and you will now see the data.
As before, if there are several channels in the constant, and you only want to select 1, you can use the Channel Names field to select the one you need, and rename it as well.
Merge
The Merge CHOP is the opposite of the Select CHOP. It takes channels from multiple CHOPs and merges them into a single CHOP.
This is a straightforward idea, but if the results are different than what you expected, you will need to middle-mouse-click on the input CHOPs to see if the Start/End samples match.
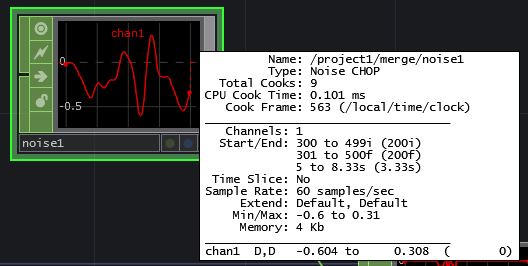
In the CHOPs pictured above, both the Start samples and the End samples differ. This is dealt with by setting the Extend Conditions on the Channel parameter page of the Generator CHOPs that are being input, as well as the Align options on the Merge parameter page of the Merge CHOP.
There is an explanation of the different Extend methods located on Extend CHOP wiki page, located here
You can also open up the example project and experiment with the extend conditions and the different Align options.
Trail
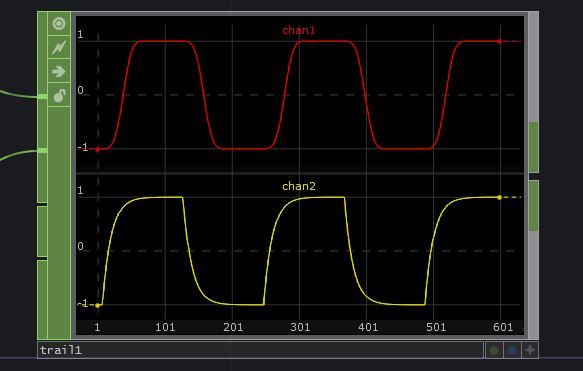
The Trail CHOP creates a visual display of how the value of it's inputs have changed over a given time. This can be very useful when you need to see subtle differences of a channels movement, or how a channel's value changes compared to another.
Filter / Lag
Filter and Lag CHOPs create a smooth transition between values over a given time. The 2 CHOPs have similar purposes, but different options.
Filter CHOP applies a smoothing effect or time, and you can choose the shape of the smoothing, with different options for different shapes.
(see /filter_lag/ example 1 of the example project file)
Lag CHOP, depending on the method of smoothing, allows you to set 2 seperate effect-lengths for an increasing input value, and decreasing input value. (see /filter_lag/ example 2 of the example project file)
Trigger
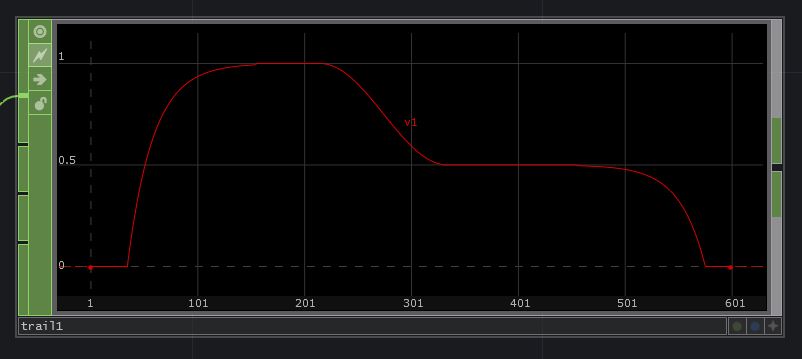
This CHOP takes an event and creates an ADSR envelope (Attack, Decay, Sustain, and Release) with some additional control.
The envelope can be triggered by the Trigger Pulse on the Trigger Parameter page, or by connecting a CHOP to its input, such as the Out of a Button.
These are the different parts of the envelope:
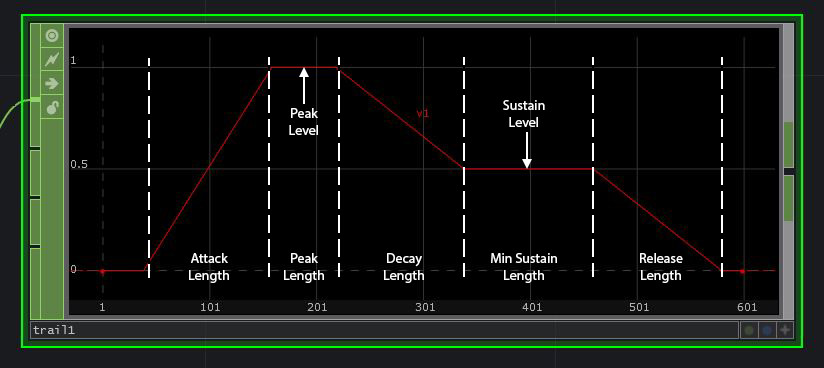
The different sections of the envelope can have easings as well.
Here is an example of with the Attack Shape set to Ease out, Decay Shape set to Ease in Ease out and the Release Shape set to Ease in:


